

Master the Reformer: Why Feet in Straps is a Game Changer for Your Core

Using feet in straps on the Pilates reformer serves as a foundational tool for building true pelvic stability. This specific setup allows you to feel the connection between your lower abdominals and your hip socket while the springs provide both support and resistance. By placing the large loops on your feet, you create a closed kinetic chain that challenges your ability to keep your hips anchored to the mat. Mastering this movement ensures that your workouts remain safe and highly productive for your long-term mobility.
How Does Proper Loop Placement Prevent Injuries?
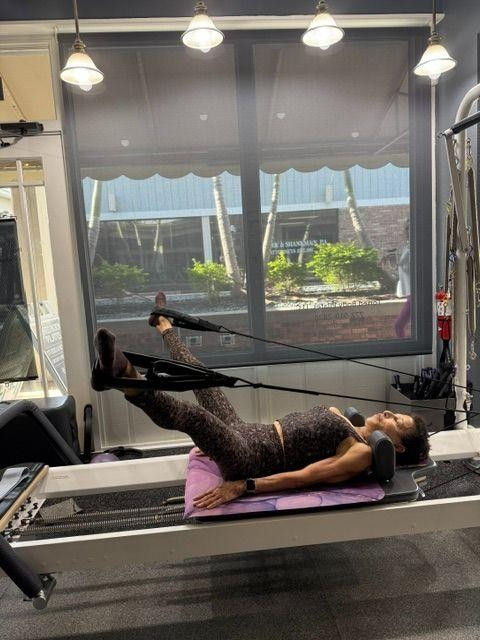
Correct setup is the first step toward a safe and powerful session on the reformer. You must place the large loops closer to your heels, specifically resting on the arches of your feet. This placement provides a secure grip and prevents the straps from slipping during active movements. When the loops sit correctly, you can push into the resistance with even pressure, which helps keep your joints aligned and reduces the risk of straining your ankles or knees.
Many people make the mistake of letting the straps slide toward their toes. This error shifts the tension away from the large muscle groups in your legs and puts unnecessary pressure on the small bones of the feet. By keeping the loops on the arches, you maintain a direct line of force from your hips through your heels. This alignment is vital for engaging the posterior chain and protecting the delicate structures of the lower leg.
Why Is the Pilates V Stance Best for Stability?
The Pilates V stance is the optimal leg position for performing feet-in-straps movements because it anchors the pelvis firmly to the mat. To find this position, bring your heels together and turn your toes out at about a 45-degree angle. This rotation happens within the hip socket, not just at the feet. This specific angle encourages the lower abdominals to engage, which keeps your pelvis from tilting or rocking as your legs move through space.
When you work in a parallel position, it is often easier for the back to arch or for the hip flexors to take over the movement. The external rotation of the Pilates V helps zip the inner thighs together and connects into the deep pelvic floor. This connection acts like an internal corset, holding your spine in a neutral position. By focusing on this stance, you move with more intention and less reliance on momentum or shallow muscle groups.
What Are the Safe Range of Motion Limits?
Maintaining a safe range of motion protects your lower back from "tweaking" or straining during leg exercises. At the high end of the movement, your legs should stop at a vertical position directly over your hips. Do not allow your feet to drift past vertically toward your face, as this can lift your tailbone and compress the lumbar spine. At the low end, you must stop your legs at a 45-degree angle from the hip to prevent strain in the lower back from arching off the mat.
Going lower than a 45-degree angle often causes the lower back to arch off the mat, which shifts the work away from your core and into your spine. Your goal is to move only as far as you can maintain a steady, heavy pelvis. If you feel your ribs popping up or your back tightening, you have gone too far. Staying within these boundaries ensures that the tension remains in your muscles rather than your joints and keeps the pelvis stable.
How Do You Perfect the Lower and Lift Movement?
The lower and lift is a simple but deep movement that requires careful breath coordination for maximum results. You should exhale deeply as you lower your legs toward that 45-degree mark and inhale as you return them to the vertical starting point. While you can perform this in a parallel or slightly internal rotation, the 45-degree Pilates V remains the best choice for beginners and pros alike to maintain pelvic control.
Concentrate on the "reach" of your legs as you lower them. Imagine your legs growing longer as they move away from your center. This creates space in the hip joint and prevents a "pinching" sensation. The return to vertical should feel controlled, as if you are resisting the pull of the springs. By moving slowly, you force the deep stabilizers to work through the entire arc of the movement.
Why Is Cadence Vital for Leg Circles?
Leg circles are a classic Pilates movement that tests your coordination and total body control. You start by exhaling to lower the legs, then open them out to the sides before circling them back up to the vertical position. A key factor in a successful leg circle is maintaining an even cadence throughout the entire revolution. Moving too quickly causes the pelvis to rock back and forth and strains the lower back, as larger muscle groups are “cheating” to bypass the difficult parts of the circle. The distance between lower back and the mat should be unchanged throughout the course of each revolution.
You should also watch the pressure in your loops. It must remain even between the left and right foot at every point in the circle. If one strap feels slack, your pelvis is likely tilting to one side. Focus on keeping the legs at that same 45-degree angle from the hip socket rather than letting the toes splay out toward the side walls. This discipline keeps the work focused on the inner thighs and deep core.
How Often Should You Repeat These Movements?
For the best results, perform leg circles a minimum of 8 to 10 times in each direction before switching. This repetition count is high enough to fatigue the muscles but low enough to maintain perfect form. During these sets, your primary focus should be the distance between your lower back and the mat. This distance should never change; your spine must stay still while your legs move independently.
Doing too many repetitions often leads to sloppy form as the core tires out. It is better to do five perfect circles than fifteen wobbly ones. If you feel your focus slipping, take a short break to reset your pelvis. Quality of movement is always the priority in the Pilates method. Consistent, mindful practice will yield much faster results than simply "powering through" the repetitions.
Why Does Pelvic Stability Matter for Daily Life?
Developing pelvic stability on the reformer translates directly to how you move in the real world. A stable pelvis supports your spine when you walk, run, or lift heavy objects. Without this foundation, the lower back often compensates for weak core muscles, leading to chronic pain. By practicing feet in straps, you teach your brain how to move your limbs while keeping your trunk steady and safe.
This type of training is especially helpful for people who sit at desks for long periods. Sitting often weakens the glutes and tightens the hip flexors, pulling the pelvis out of alignment. The stretching and strengthening provided by the straps help counteract these negative effects. You leave the studio feeling taller, more balanced, and more aware of your posture throughout the day.
What Are the Common Pitfalls to Avoid?
One major pitfall is "gripping" with the neck and shoulders while the legs are in the straps. Many people hold tension in their upper body when the lower body work gets difficult. This creates a disconnect in the kinetic chain. Your upper body should remain heavy and relaxed on the headrest, allowing the core and legs to do the heavy lifting.
Another mistake is letting the springs "ping" or snap the legs back to the starting position. This usually happens during the lift phase of the exercise. You must resist the springs on the way up just as much as you push against them on the way down. This eccentric control is where much of the strength-building happens. Always move with resistance, never with momentum.
How Can You Prepare for Advanced Inversions?
Mastering basic pelvic stability is a requirement before moving on to advanced inversion movements. Inversions involve intentionally lifting the hips off the reformer mat while the feet stay in the straps. This adds a significant challenge to your balance and spinal articulation. If you cannot keep your pelvis steady during basic circles, you risk injury when trying to lift your hips in an inversion.
Inversions are excellent for spinal decompression and building upper body strength, but they require a "quiet" center. Your instructor will look for your ability to control the straps without shaking or losing the "V" stance. Once the basics become second nature, these advanced variations become a fun and rewarding way to take your practice to the next level. Look forward to these challenges as you grow stronger.
Why Is Professional Guidance Important?
While the mechanics of feet in straps seem straightforward, having a trained eye is helpful for catching small misalignments. An instructor can see if your pelvis is tucking or if one leg is working harder than the other. These small corrections make the difference between a workout that feels "okay" and one that truly transforms your body. They provide the safety checks that keep you moving without pain.
Instructors also help you choose the right spring tension. Too much weight can make you bulk up or strain, while too little weight might not provide enough feedback for your core to engage. A professional ensures the reformer is set up specifically for your height and ability level. This personalized attention is a hallmark of a high-quality Pilates studio.
Frequently Asked Questions
Why Do My Hip Flexors Hurt During Feet in Straps?
This usually happens because your lower abdominals are not engaging enough to support the weight of your legs. To fix this, reduce your range of motion and focus on the Pilates V stance to engage the deep core. Ensure you are not lowering your legs past the point where your back begins to arch.
What Spring Tension Should I Use for Leg Circles?
Most people use two red springs or a combination of one red and one blue, depending on the reformer brand. The goal is to have enough resistance to feel the straps but not so much that you lose control of your pelvic position. Your instructor will adjust this based on your specific strength and the goal of the session. Lighter tension is more challenging for lower abdominals.
Can I Do Feet in Straps If I Have a Lower Back Injury?
Yes, but you must move with extreme caution and keep your range of motion very small. The support of the straps can actually help decompress the spine when done correctly. Always inform your instructor of any injuries so they can provide specific modifications to keep you safe.
How Do I Stop My Hips from Clicking During the Circles?
Clicking often occurs when the femur is not sitting deeply enough in the hip socket or when the hip flexors are too tight. Try making your circles smaller and focus on the external rotation of the Pilates V. This often creates the space needed for the joint to move smoothly without the audible click.
Transform Your Core at Toned Body Pilates
Toned Body Pilates offers expert instruction to help you master the reformer and improve your pelvic stability. Our classes focus on proper form and safety to ensure you get the most out of every session. We guide you through foundational movements like feet in straps so you can build a stronger, more balanced body. Contact us today to join a class and start your journey toward better movement.

Comments